Pages

Showing posts with label Vietnamese. Show all posts

Monday, September 16, 2013

Pulled Pork Bahn Mi


I like Vietnamese food and I like sandwiches, so Bahn Mi should twang my thing. Considering all the Vietnamese places around here, especially Lee's Sandwiches, you'd think I'd have had one of these once before.

Pulled Pork Bahn Mi
adapted from Cooking Club of America
click to print

1/2 c packed brown sugar
1/2 c Asian fish sauce
1/4 c rice vinegar
6 garlic cloves, minced
1 small jalapeño chile, seeded, deveined, minced
4 lb. boneless pork shoulder, cut into 4-inch pieces
3/4 c mayonnaise
1 tbsp Sriracha hot sauce, or to taste
8 mini baguettes or ciabatta rolls, split, toasted
1 (10-oz.) pkg. julienned carrots
1 medium unpeeled seedless cucumber, thinly sliced
1 c thinly sliced green onions
1 c coarsely chopped fresh cilantro

Okay, so I went cheap with the pork picnic instead of a boneless shoulder. I just removed the skin and extra fat, leaving the bone, and called it good.


Combine brown sugar, fish sauce, vinegar, garlic, and jalapeño in 5- to 6-quart slow cooker.


Place pork in slow cooker; spoon sauce mixture over pork to coat.
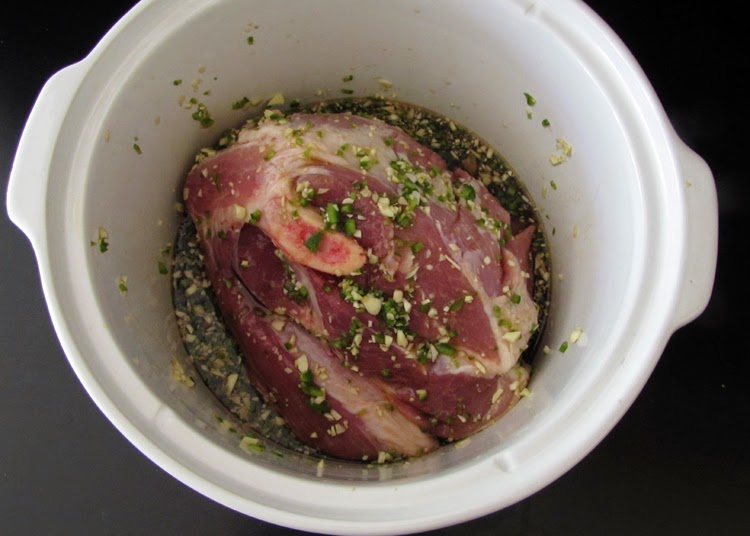

Cook, covered, on high 4 to 5 hours or on low 8 to 10 hours or until pork is fork-tender.


Remove pork; skim fat from cooking juices.

There wasn't much in the way of juices so I transferred all of it to to a little jar from which I spooned off the fat.

Shred pork with 2 forks; return to cooking juices in slow cooker. Reduce heat to low to keep warm.

It was late, nearing midnight 9/8/14 when I got to this point. Rather than keep the pork in a slow-cooker overnight, I opted to shred it, add the fatless cooking juices, and toss before storing in the refrigerator.

Meanwhile, whisk mayonnaise and hot sauce in small bowl until blended; cover and refrigerate until ready to serve.

This is scaled down to 1/4 c mayo and 1 tsp Sriracha. I figured I'd make it as I ate the sandwiches, increasing the Sriracha as appropriate each time.

Spread bread with mayonnaise mixture; top with pork, carrots, cucumber, green onions and cilantro.


It tasted good, but holy shit is it ever salty. I'm guessing it was all because of the fish sauce, there isn't anything else that is contributing so much sodium. Or because I used a 4.18 lb picnic that included a bone, lessening the total quantity of meat, thus increasing the salt per bite. Seriously, select a bread that will let you really pile the vegetables on. You'll need it. I might buy a bunch of lettuces or mixed greens and eat the rest of this as a salad with ciabatta croutons and Sriracha-mayo "dressing".

Anyway, the sandwich is definitely savory, hot, cool, crispy and crunchy. It's a texture explosion. The salt just kills is though, which is seriously disappointing. I have to try this again and get 4 pound of total meat, no bone, and use my usual fish sauce.

Cost:
  • brown sugar: $0.18
  • fish sauce: $2
  • rice vinegar: $0.29
  • garlic cloves: $0.25
  • jalapeño chile: $0.09
  • pork picnic: $4.14
  • mayonnaise: $1.32
  • Sriracha hot sauce: $0.06
  • ciabatta: $2.99
  • julienned carrots: $1.99
  • seedless cucumber: $0.99
  • green onions: $0.89
  • fresh cilantro: $0.59
Total: $15.79 or about $1.97 for each of eight sandwiches.

Sunday, October 3, 2010

Salt and Pepper Shrimp


Looking at a whole pound of shrimp for Salt and Pepper Shrimp, I knew it'd be too much. And if I cooked all of it tonight, it wouldn't maintain it's crisp for decent leftovers. So I hope the remaining shrimp will last yet another day in the fridge.


I followed a recipe from the same folks I'd obtained the Ga-Kho recipe: Ravenous Couple. Who could go wrong there? Apparently, I can, as I didn't follow their instructions. I failed to include the jalapeno while using all of the salt and pepper, yielding nicely peppered but overly salted, but not at all spicy, shrimp. I could barely choke the shrimp down due to the undue amount of salt! Be sure to read the recipe before you start!

Tom Rang Muoi Salt and Pepper Shrimp
adapted from Ravenous Couple, and seen in Saveur

10-12 large head-on shell-on shrimps
1/2 cup corn starch
1 tbsp kosher salt
1 tbsp fresh cracked pepper
1 tsp sugar
1 tsp sichuan peppercorns (optional)
cooking oil
1 medium white onion, sliced in thin wedges
1 -2 jalapenos, sliced thin and use according to taste
1 scallion, cut about 1/2 inch length
1 tbsp minced garlic

Wash shrimp in cold water and cut off long whiskers and sharp point on the head with scissors and dab dry with paper towel.


In small bowl, combine salt, pepper, and sugar and set aside.


Heat oil (I used about 3/4 cup or so) in large skillet to about 350°F. Dredge the shrimp in the corn starch to get a light coating, shaking off excess.


Fry shrimp in oil until nicely pink/red and crispy, about 3-4 minutes. Remove shrimp and drain.


Heat another large wok/pan with a bit of cooking oil, say a generous tablespoon. When oil is hot, add garlic and then onions, and scallions, quickly stir-frying a minute or so.


Add the shrimp and sprinkle in about 1/2-1 tsp seasoning mixture, instead of the entire quantity like I did. Continue to stir fry and make sure seasoning coats well, for another minute.


Transfer to serving plate and serve immediately. Sprinkle on additional seasoning according to taste -- I failed to give myself this opportunity as I used all of the salt and pepper earlier.


While the shrimp were done just right -- nice and crispy, they were quite salty.  I mean, so salty they reminded me of that one salty batch of potatoes I'd made once. So salty, I couldn't eat all of them, though I tried like hell. I can't imagine what these would've been like had I not had rice to buffer the salts.

 
And I realized once I'd completed the dish that I'd neglected the jalapeno entirely!  Egads!

 
Next time, and believe me, there will be a next time, I'll take heed to the red notices above and will include the jalapeno. I am kicking myself for making these mistakes.

 
Cost:
  • shrimp: $1.20
  • onion: $0.30
  • scallions: $0.33/bunch
TOTAL: $1.83, though I'd have to SWAG oil etc, bringing it to $2. While the quantity is supposed to serve more than one, I could've certainly put away all of the shrimp in once sitting had I followed the directions.


Friday, September 17, 2010

Ga Kho, Extremely Tame

Tame Ga Kho over steamed white rice

I started making Ga Kho two nights ago and found bugs in my rice. The chicken, typically allowed to marinate for 30 minutes, was left to marinate in the very small quantity of fish sauce and sugar since then.

Tonight I allowed that chicken to come to room temperature, stirring it occasionally.

I heated a couple tbsp olive oil over medium-high heat in a large skillet and added the marinated chicken drums and thighs to cook for three minutes.

Meanwhile, I prepared the caramelization mixture of sugar, fish sauce, vinegar, water, garlic, fresh ginger, and scallions. By the time the mixture was prepared, it'd been three minutes. A third of the mixture was poured over the chicken. About 8 minutes later, the chicken was flipped.


The remaining 2/3's of the mixture was added to the chicken, brought back to boiling, and allowed to reduce to about half, within 15 minutes.


Meanwhile, I prepped the jalapeno and green onion.

And this is where I pulled a total boob move. I removed ALL of the seeds from the jalapeno. Don't ask me WTF I was thinking. I have no good answer.

Before I knew it, the sauce was reduced to less than half. The jalapenos and green onions were added to the chicken.

Man alive, it looks gorgeous!


I didn't bother prettying it up by transferring it to a bowl and cracking pepper over it. I simply dished some into a bowl over steamed white rice. If I'm going to get gooey-faced-and-fingered, why any pretense?

While it tasted good, it was lacking spicy heat, which was disappointing. Why did I do that to the jalapeno?! Because sometimes, I'm a boob.

Sunday, February 28, 2010

Vietnamese Chicken in Carmelized-Ginger Sauce


Chicken thighs in a caramelized-ginger sauce over steamed white rice, ready to eat with my metal chopsticks.

It turned out so very well last time when I altered the cooking method slightly, I had to make the dish again just to make Rodney stop begging. Since I had about 3.4 pounds of boneless, skinless chicken thighs, it  more than covered the bottom of my biggest skillet. With that much chicken to play with, I increased the "browning" time to about 5 minutes on each side as the thigh quarters were so crowded.

And it was fantastic. The pepper, both crushed red and black, were evenly distributed throughout and enhanced the appearance of the slightly seared pieces. The ginger sauce was more of a caramel that lent stickiness and excellent flavor without being too wet and well, saucy.  I don't care for stuff that is overly sauced.

I've come to a conclusion:  my ultra-creative improvisation made this recipe perfect for us.  Further experimentation is now discontinued. Rodney and I both love how this tastes, the heat isn't too much and best of all, it doesn't cause Rodney to run to the nearest bathroom upon consumption to alleviate his poor intestinal tract.

Ha, I said nearest bathroom as if we have more than one. Isn't that cute?

Now that the chapter on this Ga Kho/Vietnamese Chicken in Caramel-Ginger Sauce is officially closed, let's recap the progression:
What hasn't evolved is the bowl, the same exact bowl as I only have one, from which I eat this chicken.

Monday, February 1, 2010

Vietnamese Chicken in Caramel-Ginger Sauce, Improved


Thick caramel-ginger sauce on pan-seared chicken thigh pieces, served over steamed white rice.

Rodney requested the Vietnamese Chicken recipe the old way again. Instead of going experimental with the ingredients, I thought I'd implement some cooking methods of the Ravenous Couple's Ga Kho recipe by doing more of a chicken sear, increase cooking times in other areas, and eliminate the addition of water. It'll be interesting to see if the sauce turns out to be more of a caramel.

Click the link below to see how I did it last time and what my comments were:

Vietnamese Chicken in Caramel-Ginger Sauce

2 tbsp olive oil
3 lb. boneless skinless chicken thighs, quartered
3 tbsp minced fresh ginger
2 tbsp chopped shallots or onion
1 tbsp minced garlic
2 tbsp fish sauce
2 tbsp packed light brown sugar
1 tbsp sugar
1/2 tsp salt
1/2 tsp freshly ground pepper
1/2 to 1 tsp crushed red pepper
1 c diagonally sliced green onions (2 inches)

Heat large skillet over medium-high heat until hot. Add oil; heat until hot. Add chicken thighs, shake to spread out evenly and cook 2 minutes before turning chicken pieces.


Flip chicken and cook an additional 3-5 minutes without stirring.


Add ginger, shallots and garlic; cook and stir 2 minutes.


Add fish sauce, sugars and peppers; stir. Bring to a boil; boil until sauce is thickened, about 5 minutes.


Add green onions, reduce heat to low and continue to cook until sauce is further reduced, approximately 9 minutes.


Serve over steamed rice. And a side of kimchi if you see fit.


This was fantastic -- not as good as Ravenous Couple's Ga Kho, but it was much closer in texture, flavor and caramel-ness -- and much better than how I'd been making this recipe before.

The alterations in cooking times made a tremendous difference, particularly how the chicken was first cooked. Usually, I'd flip the chicken pieces regularly to ensure even browning; this time I added the chicken and only tossed the pieces once to get really nice browning on two sides. While not exactly a sear, it did make a difference in the texture of the meat.

Extended cooking times upon each addition (ginger and sugar mixtures) improved the consistency, bringing the sauce more toward a caramelization.

Dark meat is necessary in this recipe due to the prolonged heat exposure and cooking times. Doing this with breast meat is a way to ensure dry flesh. Don't make that mistake!! I regret having ever done this recipe with breasts.

Cost:

  • chicken: $4.98
  • minced ginger: $1.75
  • green onions: $0.79
Total: $7.52+$1 SWAG for everything else: $8.52, making each serving $2.84.

In the future, I'll do this again with whole chicken thighs and I'll be sure to sear the chicken pieces on each side before moving on.